


HAPPY GUMNUT
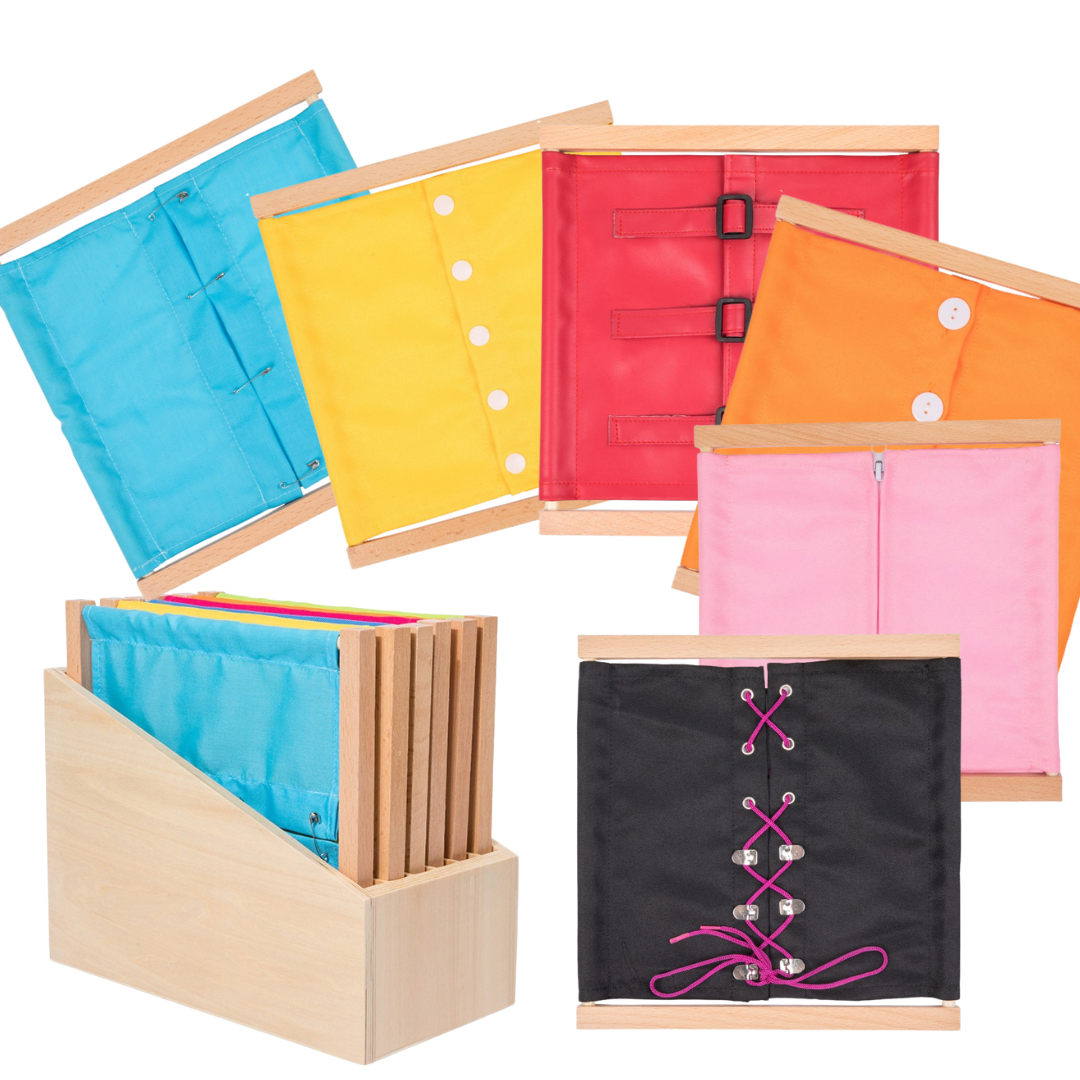
Montessori Dressing Frames A and Storage Box Set of 6
Montessori Dressing Frames A and Storage Box Set of 6
Couldn't load pickup availability
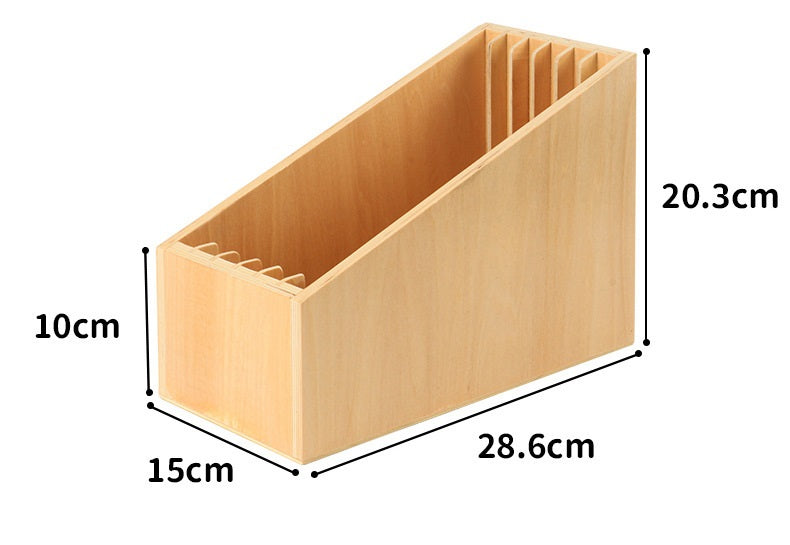
Montessori Set of 6 Dressing Frames A and Storage Box
The Dressing Frame is a key Montessori Practical Life material which helps children to develop independence and care of self as they learn to fasten different clothing implements.
The material is comprised of a wooden tower, which supports 3 different ‘frames’ on each of it’s four sides. These frames hold material and different types of fasteners which children may encounter while dressing. They include:
- Zipping Frame
- Buttoning Frame Small and Large
- Lacing Frame
- Buckling Frame
- Pinning Frame (dangerous PLEASE BE CAREFUL)
Purpose
The Dressing Frames primary purpose is to teach children how to dress themselves through mastering different clothing fasteners. This process also tests a child’s hand eye coordination and fine motor skills, as they work with each material.
Children are first introduced to the Large Buttoning Frame and Zip Frame from the age of two, and as their skill level builds they are challenged with harder implements.
Presentation: The Large Buttoning Frame
- Invite the child to come work with you, and guide them to the Practical Life curriculum area.
- Identify the Dressing Frame and select the Large Buttoning Frame.
- Bring the frame to a table and introduce the frame by saying ‘This is the Large Buttoning Frame’.
- Tell the child that you will be showing them how to unbutton and button.
- Begin with unbuttoning by pinching the top button with one hand and the material on the other side with your opposing hand.
- Pull the material to create a hole, tilt the button down, and then slide it through the hole.
- Show the child that the button is now free from the material.
- Repeat this process on the following buttons in order, working slowly to allow the child to watch each step.
- Next, working from the top, pinch the button and material on the other side.
- Slide the button halfway through the hole, then re-adjust your grip on the button to pinch the side of the button which is coming through the hole.
- Pull the button until it is through the hole.
- Repeat this process for the following buttons in order, working slowly to allow the child to watch each step.
- Once all buttons are fastened, offer the child a turn to unbutton and button the frame.
Presentation: The Zipping Frame
- Invite the child to come work with you, and guide them to the Practical Life curriculum area.
- Identify the Dressing Frame and select the Zipper Frame.
- Bring the frame to a table and introduce the frame by saying ‘This is the Zipping Frame’.
- Tell the child that you will be showing them how to zip and unzip.
- Place a hand on one side of the frame, and pinch the zip with the other hand.
- Pull the zipper down, working slowly to allow the child to watch the process.
- Next, hold down the material at the bottom of the frame with one hand, and use your other hand to pull the zipper up.
- Once complete, offer the child a turn to zip and unzip the frame.
It May Contain Sharp/blunt objects that are not suitable for toddlers or may contain a Choking Hazard
please exercise care when giving to your children and supervise them while they play
Share


This is the third time I have bought from this business. Very happy so far. One item arrived that was not optimal and they were amazing to deal with- super efficient providing a replacement for something else.I run a family day care and Happy Gumnut is my go to for learning resources that are affordable, durable and well used among my children. This small business will continue to remain in my top 5, especially after seeing first hand how great their customer support is -(rare these days)